
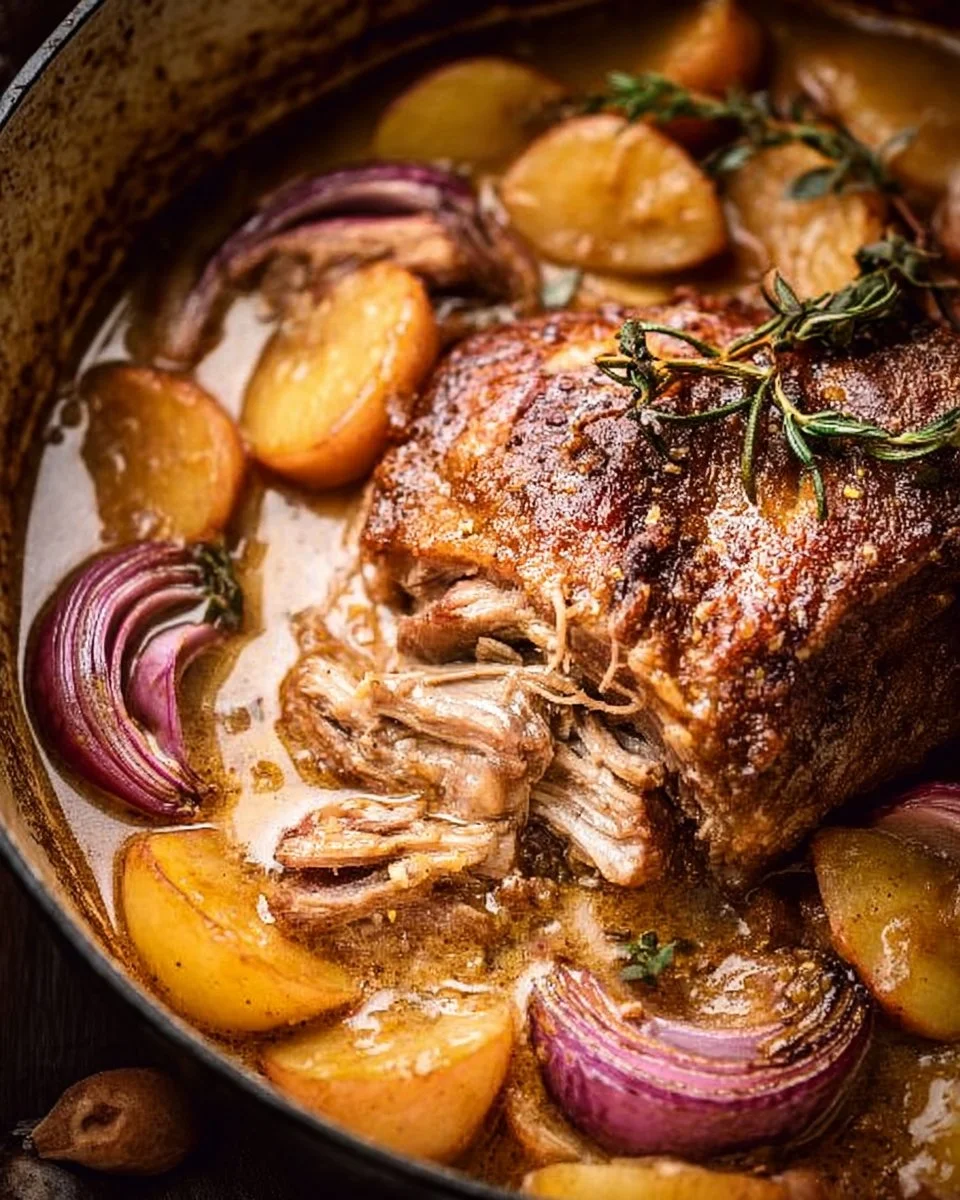
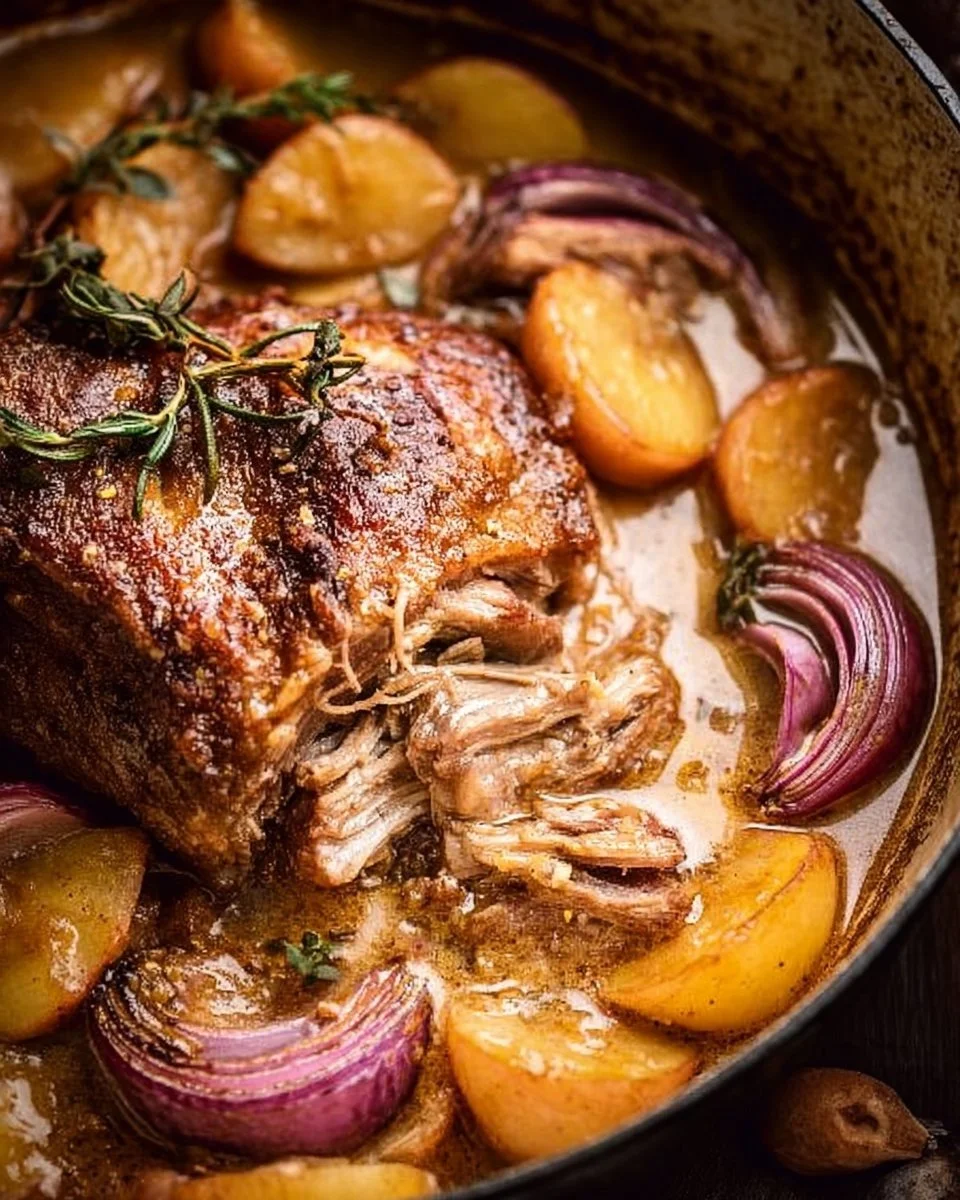
There’s something magical about a comforting, hearty dish that fills the home with warm aromas as it cooks. The Apple Cider Braised Pork Shoulder is one of those recipes that transform a simple piece of meat into an incredibly flavorful and tender meal. Infused with the sweet-tart notes of fresh apple cider and the savory depth of herbs and vegetables, this dish embodies the essence of autumn and is perfect for cozy family dinners or gatherings with friends.
What makes it even better is how easy it is to prepare. With just a few simple ingredients, mostly pantry staples, you can create a stunning dish that tastes like it took all day to make. Perfect for both novice and seasoned cooks alike, this recipe will surely impress everyone at your table. So, roll up your sleeves and let’s dive into how to make this delicious apple cider braised pork shoulder!
Why This Recipe is a Game-Changer
This particular recipe stands out because it beautifully marries flavor with simplicity. Here’s why you’ll want to make this dish:
- Effortless Preparation: With minimal hands-on cooking time, the oven does most of the work for you.
- Budget-Friendly: Pork shoulder is an economical cut of meat that yields fantastic flavor and tenderness when cooked low and slow.
- Rich Flavor: The combination of apple cider, herbs, and garlic creates a complex flavor profile that enhances the pork in the best way.
- Comfort Food: This dish exudes comfort and is perfect for any occasion, whether it’s a family dinner or a festive holiday gathering.
How This Dish Comes Together
Making apple cider braised pork shoulder is a straightforward process that anyone can master. First, you’ll sear the pork shoulder to lock in the juices and create a beautiful crust. Then, you’ll combine the braising liquid made with apple cider and chicken stock, which becomes a flavorful base. The dish simmers in the oven, allowing all the ingredients to meld together while the pork absorbs all those delightful flavors.
The final touch includes adding hearty vegetables and apples, which cook down into a luscious sauce that perfectly complements the tender pork. With a little patience, you’ll have a sumptuous meal that will leave everyone wanting seconds!
Ingredients
Prep Time: 20 minutes
Cook Time: 4 hours
Total Time: 4 hours 20 minutes
Servings: 6-8 servings
- 4-5 lb pork shoulder roast or Boston butt roast*
- 2 tablespoons neutral oil
- 2 cups fresh apple cider* (not apple cider vinegar)
- 2 cups chicken stock or broth
- 2 tablespoons Dijon mustard
- 1 tablespoon dehydrated minced onion
- 1 head of garlic, top sliced off opposite of the root end
- 3 rosemary sprigs
- 4 thyme sprigs
- 1 red onion, cut into thick slices
- 2 firm and slightly tart apples*, peeled and cut into wedges
- Kosher salt
- Freshly cracked black pepper
Step-by-Step Instructions
Begin by preheating your oven to 325°F. This low and slow cook will ensure the pork shoulder becomes incredibly tender.
Start by trimming any excess fat from the pork shoulder if there are large fat caps. You can choose to cut the pork into 4 large pieces or leave it whole if it’s bone-in. Using a paper towel, pat the pork pieces dry. This helps the meat to sear nicely instead of steaming. Season liberally with kosher salt and freshly cracked black pepper.
Next, heat the neutral oil in a large Dutch oven over medium-high heat. Once the oil is hot, carefully place the pork in a single layer. Allow it to sear for about 4-5 minutes per side or until it’s deeply browned. Make sure to repeat this on all sides. Depending on the size of your Dutch oven, you might need to sear the meat in batches to avoid overcrowding.
While the pork is browning, whisk together the apple cider, chicken stock or broth, Dijon mustard, and dehydrated minced onion in a separate bowl and set it aside. This mixture will create that flavorful braising liquid that the pork cooks in. Additionally, use kitchen twine to tie together the rosemary and thyme in a small bundle. This makes them easier to remove later while infusing their flavor into the dish.
After the pork is browned evenly, pour the braising liquid into the pot. Arrange the herbs and the head of garlic in with the pork. Cover the pot and place it in the oven for braising.
You’ll want to braise the pork for about 3 hours. Start checking for doneness around 2 and a half hours if it’s boneless, flipping the pork halfway through. When the pork is just short of fork tender, it’s time to remove it from the oven. Arrange the thick slices of red onion and apple wedges around the pork. Cover it again and return it to the oven for an additional 30-45 minutes. The pork should be perfectly tender by now.
Once the cooking is complete, take the pork out of the oven and let it rest in the braising liquid for 30 minutes before serving. Squeeze the softened garlic cloves out of their husk directly into the broth or onto the pork. Taste and season the braising liquid with more salt and pepper as needed. Finally, serve spooning the juices over the pork, apples, and onions for that perfect finishing touch!
Delicious Ways to Serve This Dish
This apple cider braised pork shoulder shines as the centerpiece of your meal. Consider serving it with:
- Mashed Potatoes: They soak up the delicious juices beautifully.
- Roasted Root Vegetables: Carrots, parsnips, and beets complement the dish’s flavors.
- Crusty Bread: Perfect for mopping up every last bit of the sauce.
- Simple Green Salad: A light, fresh salad balances the richness of the pork.
For drinks, consider a glass of Chardonnay or a light red wine for an elegant touch. This dish is also perfect for festive occasions, family gatherings, or simply a Sunday dinner at home.
How to Store Leftovers
If you have leftovers, you can store them in an airtight container in the refrigerator for up to 3-4 days. If you’d like to keep them longer, consider freezing the pork in portions. Wrap the meat tightly in plastic wrap and place it in a freezer-safe bag. It can last up to 3 months in the freezer.
When it’s time to reheat, thaw the pork in the refrigerator overnight if it’s frozen. To reheat, place the meat in a baking dish covered with foil in a preheated oven at 300°F until warmed through, about 25-30 minutes. You can also reheat it in a skillet over low heat, adding a splash of the braising liquid to keep it moist.
Insider Cooking Tips
To ensure you get the best results from your cooking, keep these tips in mind:
- Don’t rush the searing process! A good sear will develop a deep flavor.
- Adjust the seasoning in the braising liquid to your taste; it’s all about layering flavors.
- Feel free to taste the liquid before the final simmer – it should be rich and flavorful.
- Letting the pork rest in the braising liquid is crucial; it allows the meat to absorb even more flavor.
Avoid common mistakes such as overcrowding your pot while searing the meat or skipping the resting time. Both can lead to less flavorful and tender pork.
Creative Twists on This Recipe
Feel free to dial the recipe to your taste with these variations:
- Fruit Substitutions: Use pears in place of apples for a different sweetness.
- Herb Changes: Experiment with adding fresh sage or using herbal blends like Herbes de Provence.
- Spicy Kick: Introduce a touch of chili powder or crushed red pepper for a spicy note.
- Gluten-Free Option: Ensure the chicken stock is gluten-free for those with dietary restrictions.
These simple swaps can make the dish uniquely yours while still holding onto that comforting, classic vibe.
Frequently Asked Questions
Can I use a different cut of pork?
You can! Cuts like pork loin or picnic shoulder work well, but adjust the cooking time accordingly.
How do I know when the pork is done?
The meat should be very tender and easily shred with a fork, typically around 195°F if using a meat thermometer.
Can I prepare this dish in advance?
Absolutely! You can braise the pork a day ahead, then reheat it when you’re ready to serve.
What side dishes pair best with this recipe?
Consider classic sides such as mashed potatoes, greens, or roasted seasonal vegetables to complement the rich flavors.
Is it necessary to tie the herbs together?
It’s not required, but tying them helps infuse the pork with flavor while making them easy to remove later.